


0 of 0


About this mod
Various wigs using ApachiiSkyHair. All wigs come in four colors. There are six styles of stand-alone wigs, another style modified to fit the Nordic Carved helm, and the same style modified again for the Iron helm. They use Hein84's retextures whenever possible.
- Permissions and credits
**Please note that evenstargw has created a mod that is far superior. I recommend using it instead of this mod.**
Description
This adds craftable wigs of ApachiiSkyHair-styles. Six of them are unedited, stand-alone wigs that are not meant for use with helms. Another style was re-shaped to fit under the Nordic Carved helm, and another wig of the same style was re-shaped for the vanilla Iron helm.
I used Hein84's ApachiiSkyHair natural Retexture whenever possible and adjusted them for four versions: black, blonde, brunette, and white. They're craftable at any forge under Jewelry. The helm wigs are named so they'll show up next to the armor set in your inventory, ie: "Nordic Carved Wig (Color)". I also made them enchantable so they can be renamed.
I've tried to make these as passive and non-intrusive as possible. Only the waterbreathing enchantment is allowed (just so they can be renamed, I think it's the most non-intrusive enchantment available), no ingredients are required to craft them, and the value and weight are as low as possible.
The two helm wigs were altered for these specific helms, so they'll probably clip if used with other helms or hoods. Also, the helm wigs are not intended for characters using long, vanilla hairstyles (see 'Known Issues' below). Rather, they're intended for characters using modded hairstyles as they go bald when a helm is equipped (see my second screenshot above).
Please post any questions, issues, requests, etc.
Requirements
Technically none. This doesn't require the Dragonborn DLC, but one wig was made specifically for the Nordic Carved helm which is only available from that DLC. It can still be used without the DLC, but it would look weird without the helm.
Known Issues
~Vanilla hairstyles with long hair still show the long hair portion with the helm wigs, causing clipping, and the color of your hair and wig probably won't match. This is because the long portion uses a separate slot from the normal hair slot, and this additional long hair slot (41) isn't being overridden by the wigs (modded hairstyles don't use this slot so it's not an issue). I've tried using or just including the long hair slot 41, and changing priorities, but no luck yet. Searching for a fix and will update if I figure it out.
Installing/Uninstalling
NMM download is available, while manual installation is as usual. Unzip the files and move them to your Data directory, which is typically found at:
C:Program FilesSteamsteamappscommonSkyrimData
Then run the normal Skyrim launcher from Steam and click "Data Files". In the list, make sure this mod gets activated with a checkmark (it should get a checkmark automatically when you run the launcher, just take a look to be sure). The load order should not matter. Please note that the .esp is called "Nordic Carved Helm Wigs". This was its original name, and I re-named it on Nexus when the stand-alone wigs were added. I chose not to re-name the .esp so people who already downloaded it wouldn't have to reinstall to get updates. Just FYI, it is the full mod.
I considered uploading this to BOSS, but I'm not sure it's worth it since it's such a basic mod that only adds new items. Pretty sure this means it's impossible for it to conflict with any other mod. I scanned it with TES5Edit just for the record and it's clean.
Recommendations
Categorized Favorites Menu by favmenumodder. Overall an excellent highly customizable mod, and one feature that compliments these wigs particularly well is the equipment set shortcut. Ctrl 1-0 shortcuts let you equip any combination of gear, customizable via .cfg text files, and you can always add more shortcuts that can be manually clicked in your new expanded favorites menu. Add these wigs to equipment sets and you'll never have to manually equip them again, making them even less intrusive. :-)
Race Menu by expired6978. My wigs provide a quick and easy way to change hairstyles or to pass them out to NPCs, but of course they are limited and were only designed for quick convenience. For full customization, I highly recommend the Race Menu mod. It seems that many additional character mods are being created to be compatible with the Race Menu mod as well.
Change-Log
[Update to 1.5]
Thanks to Mookeylama for finding a fix for transparency issues! All stand-alone wigs have been updated to fix this. If anyone still notices transparency, please let me know.
Also updated the mesh of one wig (long, blonde) that still had textures pointing to Apachii's mod, which meant if you didn't have her mod installed, the texture wouldn't show.
_______________________________
[Update to 1.4]
All wigs are now available in white, and also fixed an issue causing two of the Iron helm wigs for females to be invisible.
_______________________________
[Update to 1.3]
Six styles for stand-alone wigs have been added (see third screenshot above). To update, just overwrite all files.
_______________________________
[Update to 1.2]
Wigs to fit the Iron helm have been added, named "Iron Helm Wig (Color)".
_______________________________
[Update to 1.1]
Support for male characters added (I thought the mesh would need editing but it doesn't appear to, so it was an easy fix). If you're updating from 1.0, just overwrite the .esp file.
Permissions
I received permission from apachii and Hein84 to release modified versions of their resources. If you'd like to release a revised version of this mod, get permission from them for their meshes/retextures. You don't need permission from me, I only ask that you don't upload it anywhere but here on the Nexus.
Credits
~Bethesda, big fan since Daggerfall <3
~apachii for the excellent ApachiiSkyHair mod
~Hein84 for the excellent Retextures
~Those who have commented with feedback and ideas, especially Mookeylama!
Thanks!
~CaBaL120 for the excellent aMidianBorn Nordic Carved retextures seen in my screenshots
~Nexus and its community :)
_________________________________________________________________________________
Modder's Guide
Here's a tutorial of the steps I used to make these. This doesn't include edits to the meshes I made to the helm wigs so they'd fit without clipping. Please leave a comment if you have any questions.
PART 1 - NIFSKOPE
Nifskope is open-source 3rd party software written to edit .nif files, the file-format Bethesda uses for 3D models in their recent games. If you don't have it yet, download the latest version here: http://niftools.sourceforge.net/wiki/NifSkope
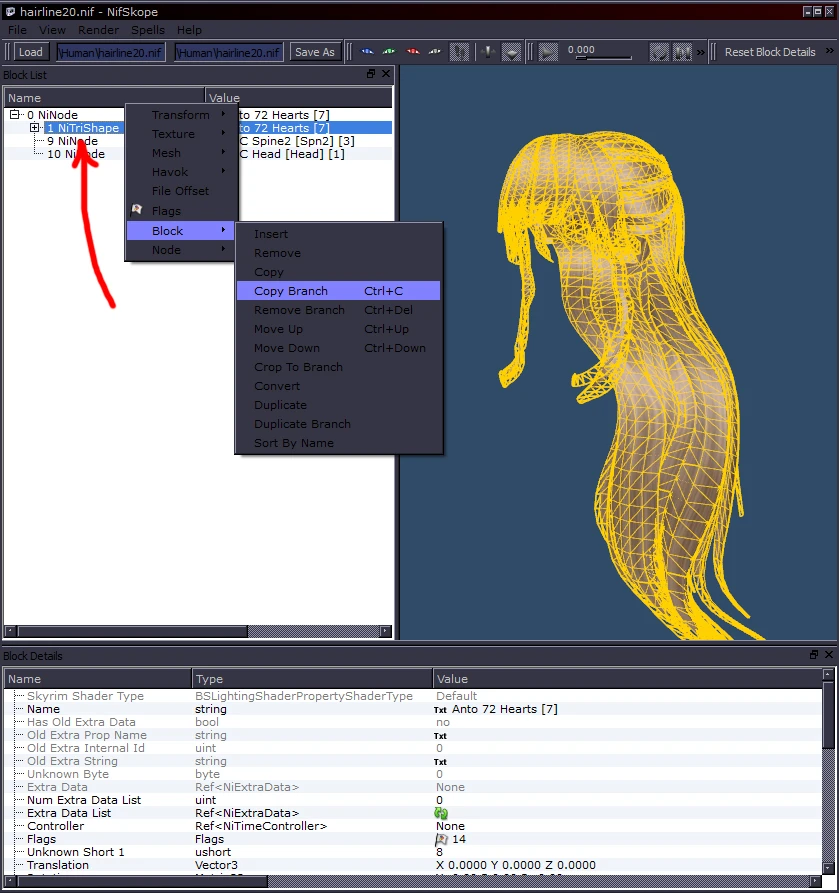
Hairstyles will commonly come in two mesh files - the original and a "hairline" copy. For example, "hair20.nif" and a corresponding "hairline20.nif". In this first step, we're going to paste these two meshes together to resolve transparency issues. Open both .nifs and in the hairline mesh, right-click on the "NiTriShape" node, then under "Block", copy the branch (or just highlight and ctrl-C).
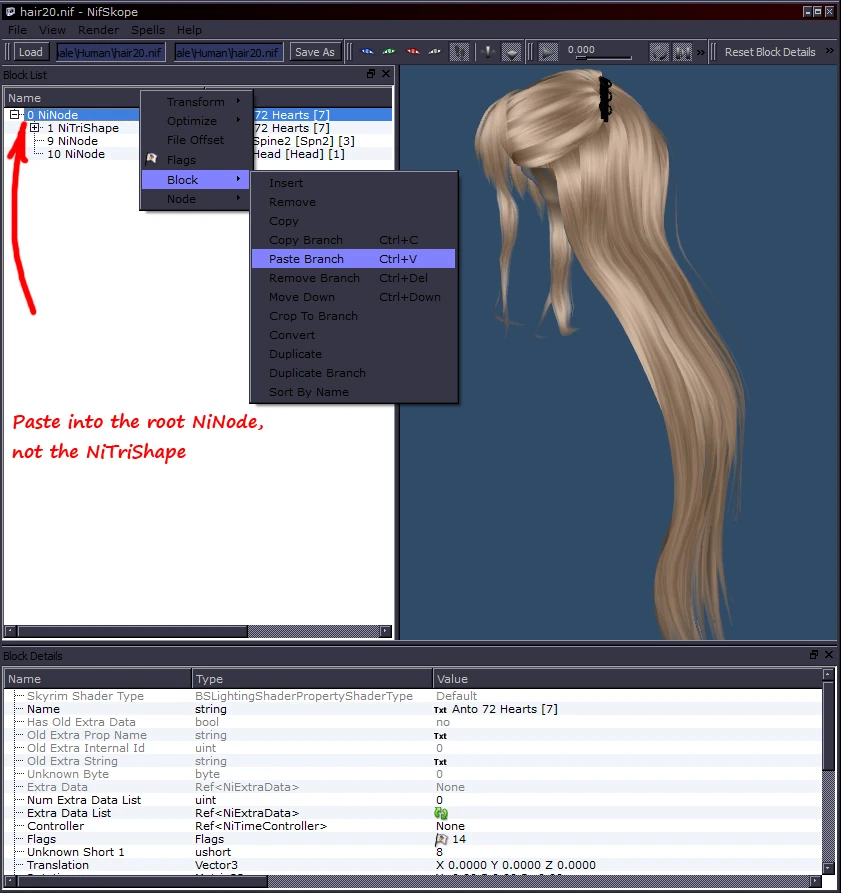
Alt-tab to the original mesh and paste the branch into the root "NiNode".
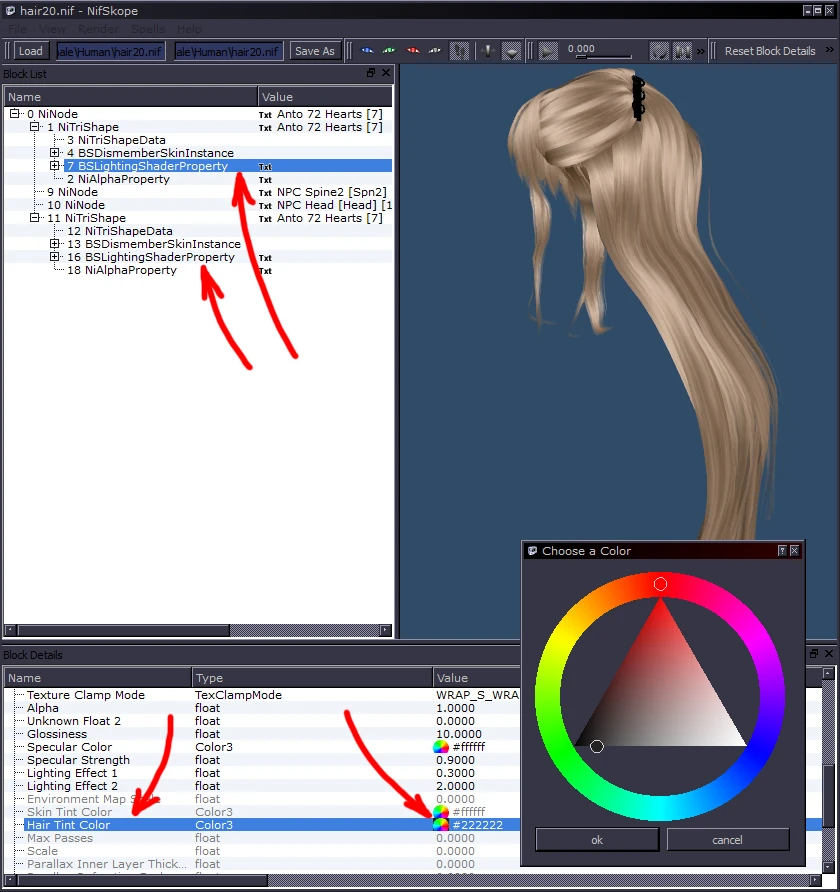
You're done with the hairline mesh so you can close it. Your original hair mesh should now look like this. I've expanded the "NiTriShape" nodes of both branches so you can see the "BSLightingShaderProperty" nodes for each. To change hair-color, you can edit the hair tint line found in the block details below, and/or create edited textures (see the next step). Note that you can open the color-wheel or click the actual hex color-code to enter the three 3-digit color values manually (useful if you want the exact same color every time).
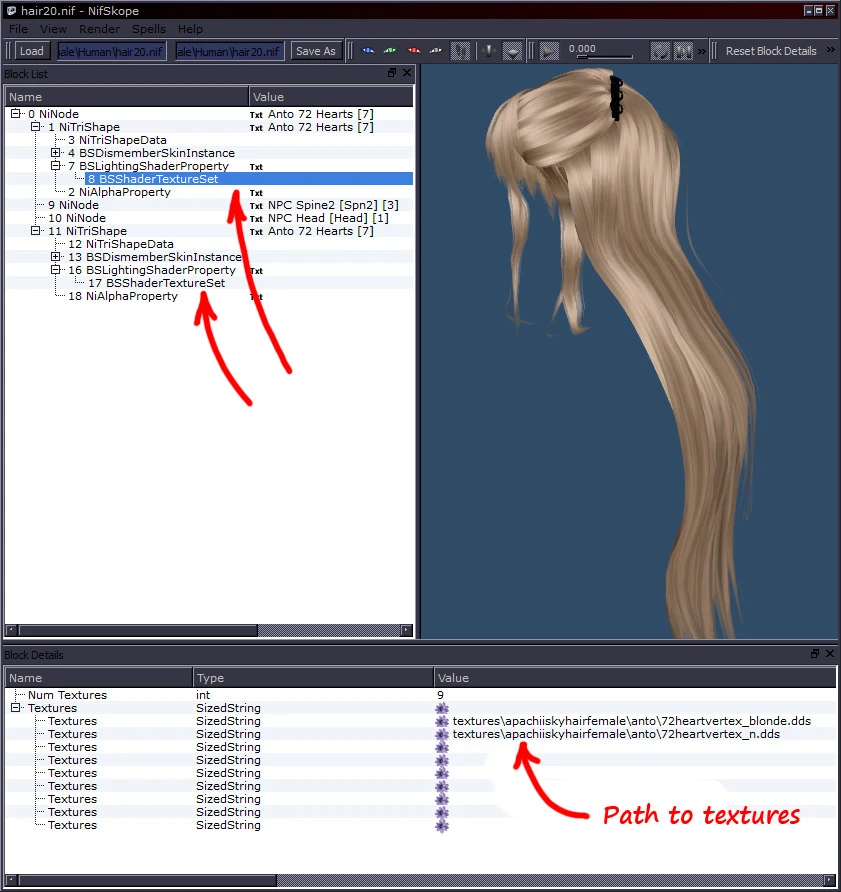
Now I've expanded the "BSLighingShaderProperty" node to reveal the "BSShaderTextureSet" node. Notice the paths to the textures in the block details window below. If you want to customize the textures, you'll need to change these paths to your new textures (double-click the path to edit).
Remember that we're working with two "NiTriShapes" of the same style (the original and the one we pasted in from the hairline mesh), so any changes you make need to be applied to both.
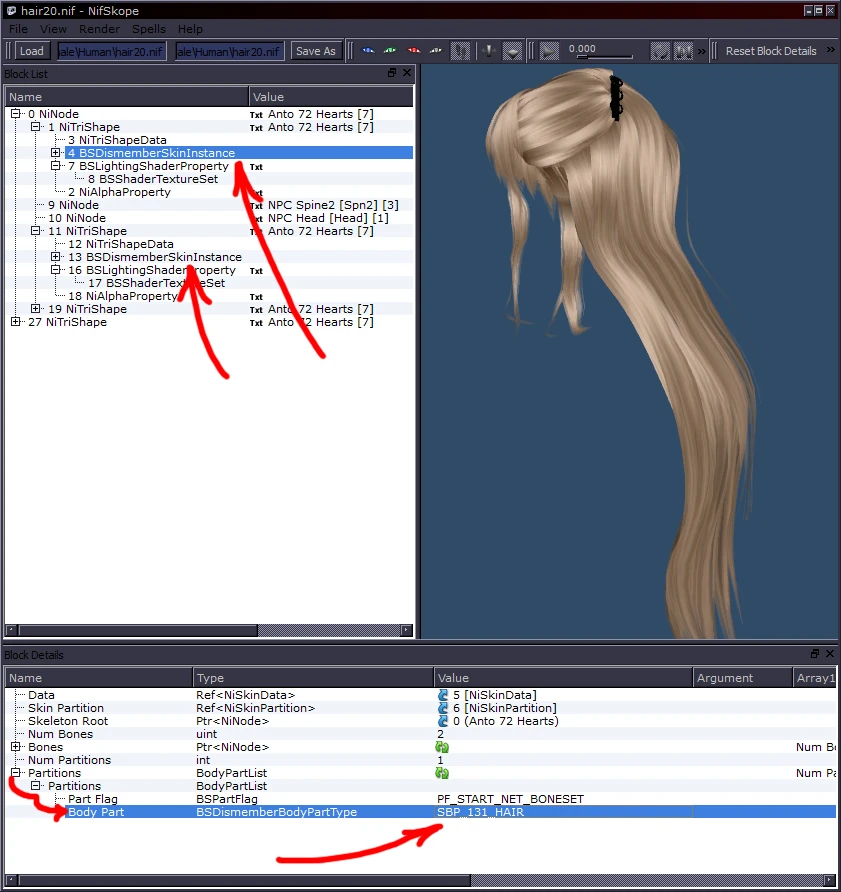
Highlight the "BSDismemberSkinInstance" node. Expand the "Partitions" line in the block details and you'll see the "Body Part" line. This determines which slot is used, and must match what's used in the ArmorAddon in the CK or your item will be invisible when worn. For the stand-alone wigs, I use the default slot for hair (seen in the screenshot, SBP_131_HAIR, which is just called 31 in the CK), which will replace the character's hair when worn. So if you're making a normal wig like those, no changes should be needed here. For the helm wigs, I used slot 60 since the character's hair (slot 31) is hidden while wearing a helm. Note that slot 60 is a miscellaneous slot, so it might be used by other items added by other mods, meaning you could only wear one at a time unless you manually change to a different slot.
A number of additional changes can be made to the mesh here in Nifskope, but for now this is all you'll need to add a basic wig. "Save as" a new filename, and preferably save it in a new directory under your name in ...datameshes, or throw it in my Dupre232 mesh directory if you like.
PART 2 - CK
Start a new mod or just work with mine, "Nordic Carved Wigs.esp". Go to the "Armor" category and right-click --> duplicate something simple like a vanilla circlet, or if you're editing my mod, duplicate one of my wigs. Double-click this duplicate to edit and change the ID to anything as long as there's no spaces (I usually start the ID with "01" so it shows up at the top of every list). Change the name field below to be what you want the wig called in-game. Below, I make the value 1, the weight 0.01, and make sure armor is 0. For now, click OK and a warning will pop up asking if you want to make a new form. Click no, it'll ask if you're sure, click yes. Open it back up again and make sure "Default Race" appears in the drop-down menu at the top, then highlight / un-highlight slots until only 31 and 41 are selected (or whichever slot you used in your mesh).
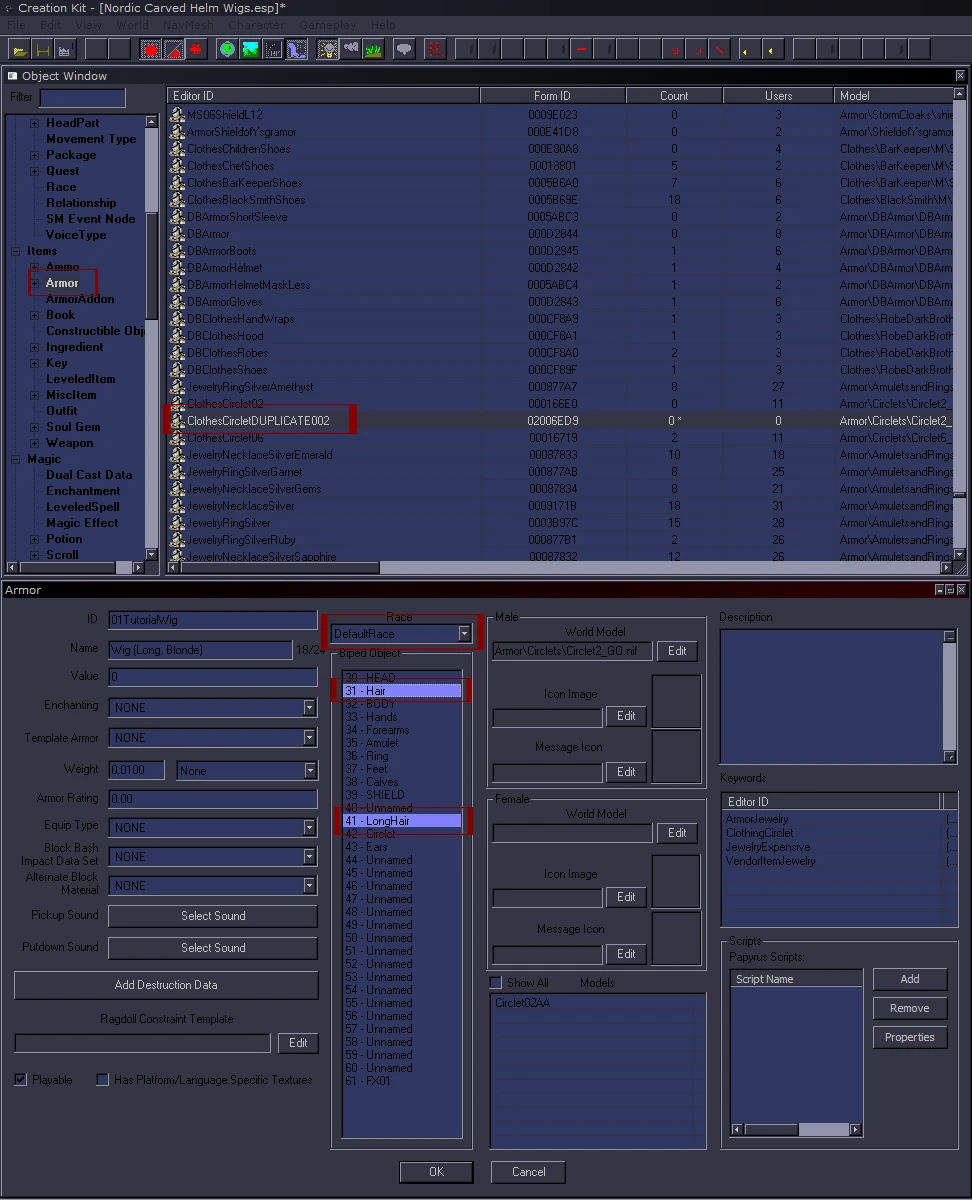
If you're working with my mod, you'll notice my wigs use a keyword called "Dupre232Wig". This links to their enchantment info so that only the waterbreathing enchantment is possible. I also removed the "ClothingCirclet" and "JewelryExpensive" keywords. These changes are all optional.
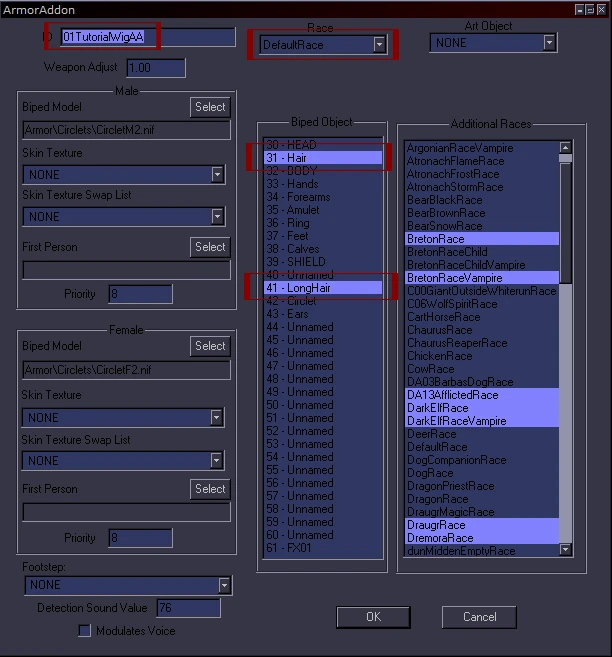
Double-click the ArmorAddon listed in the box near the bottom (in the above screenshot, it's Circlet02AA). Enter a new ID (I usually go with the same ID as the item itself, with "AA" added to the end). Click OK and you'll get the same warning, but this time click Yes to create a new AA form. Back in the Armor window, the original AA will still be there. Right-click and delete it, then right-click again to add the new AA you just created. Now open this AA and highlight / unhighlight to get the same slots you used, making sure "Default Race" is selected above.
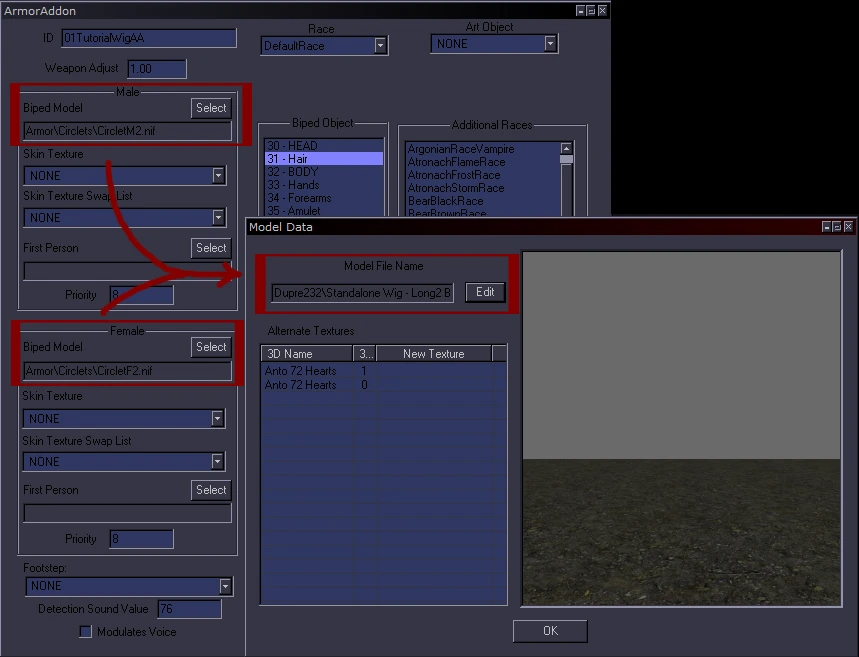
On the left side of this ArmorAddon window, you'll see a section for male and female data. Under whichever gender your wig is intended for (or both), click "Select" next to "Biped Model", then in the window that pops up, click "Edit" and browse to your wig's mesh.
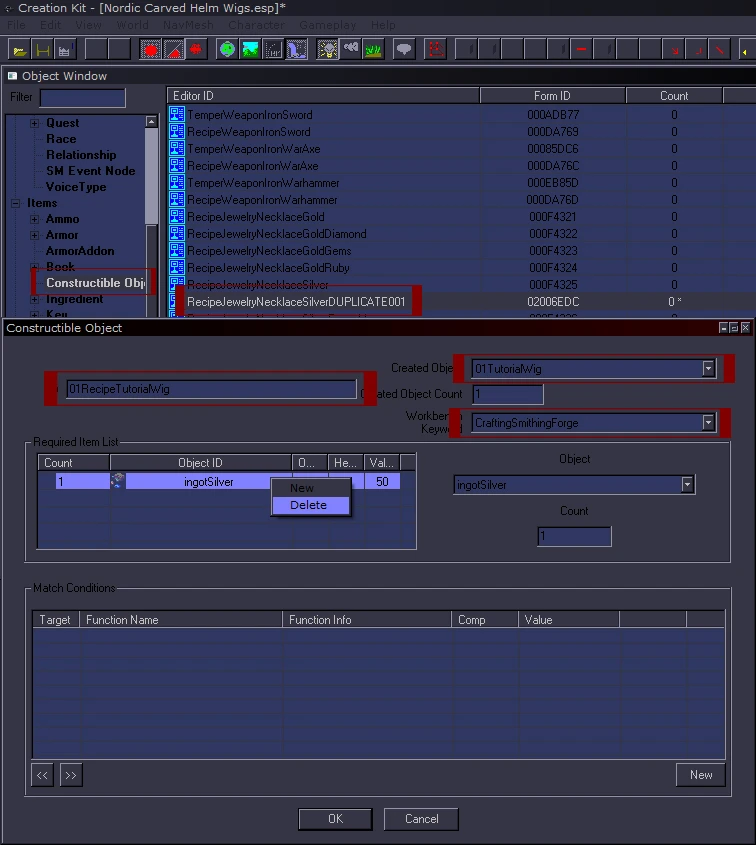
To make it craftable, go to the "Constructable Object" section and create a recipe, or duplicate a simple one like the silver necklace. Enter a unique ID for the recipe, select your wig in the "Created Object" field, choose your workbench and any ingredients (I deleted all ingredients).
Description
This adds craftable wigs of ApachiiSkyHair-styles. Six of them are unedited, stand-alone wigs that are not meant for use with helms. Another style was re-shaped to fit under the Nordic Carved helm, and another wig of the same style was re-shaped for the vanilla Iron helm.
I used Hein84's ApachiiSkyHair natural Retexture whenever possible and adjusted them for four versions: black, blonde, brunette, and white. They're craftable at any forge under Jewelry. The helm wigs are named so they'll show up next to the armor set in your inventory, ie: "Nordic Carved Wig (Color)". I also made them enchantable so they can be renamed.
I've tried to make these as passive and non-intrusive as possible. Only the waterbreathing enchantment is allowed (just so they can be renamed, I think it's the most non-intrusive enchantment available), no ingredients are required to craft them, and the value and weight are as low as possible.
The two helm wigs were altered for these specific helms, so they'll probably clip if used with other helms or hoods. Also, the helm wigs are not intended for characters using long, vanilla hairstyles (see 'Known Issues' below). Rather, they're intended for characters using modded hairstyles as they go bald when a helm is equipped (see my second screenshot above).
Please post any questions, issues, requests, etc.
Requirements
Technically none. This doesn't require the Dragonborn DLC, but one wig was made specifically for the Nordic Carved helm which is only available from that DLC. It can still be used without the DLC, but it would look weird without the helm.
Known Issues
~Vanilla hairstyles with long hair still show the long hair portion with the helm wigs, causing clipping, and the color of your hair and wig probably won't match. This is because the long portion uses a separate slot from the normal hair slot, and this additional long hair slot (41) isn't being overridden by the wigs (modded hairstyles don't use this slot so it's not an issue). I've tried using or just including the long hair slot 41, and changing priorities, but no luck yet. Searching for a fix and will update if I figure it out.
Installing/Uninstalling
NMM download is available, while manual installation is as usual. Unzip the files and move them to your Data directory, which is typically found at:
C:Program FilesSteamsteamappscommonSkyrimData
Then run the normal Skyrim launcher from Steam and click "Data Files". In the list, make sure this mod gets activated with a checkmark (it should get a checkmark automatically when you run the launcher, just take a look to be sure). The load order should not matter. Please note that the .esp is called "Nordic Carved Helm Wigs". This was its original name, and I re-named it on Nexus when the stand-alone wigs were added. I chose not to re-name the .esp so people who already downloaded it wouldn't have to reinstall to get updates. Just FYI, it is the full mod.
I considered uploading this to BOSS, but I'm not sure it's worth it since it's such a basic mod that only adds new items. Pretty sure this means it's impossible for it to conflict with any other mod. I scanned it with TES5Edit just for the record and it's clean.
Recommendations
Categorized Favorites Menu by favmenumodder. Overall an excellent highly customizable mod, and one feature that compliments these wigs particularly well is the equipment set shortcut. Ctrl 1-0 shortcuts let you equip any combination of gear, customizable via .cfg text files, and you can always add more shortcuts that can be manually clicked in your new expanded favorites menu. Add these wigs to equipment sets and you'll never have to manually equip them again, making them even less intrusive. :-)
Race Menu by expired6978. My wigs provide a quick and easy way to change hairstyles or to pass them out to NPCs, but of course they are limited and were only designed for quick convenience. For full customization, I highly recommend the Race Menu mod. It seems that many additional character mods are being created to be compatible with the Race Menu mod as well.
Change-Log
[Update to 1.5]
Thanks to Mookeylama for finding a fix for transparency issues! All stand-alone wigs have been updated to fix this. If anyone still notices transparency, please let me know.
Also updated the mesh of one wig (long, blonde) that still had textures pointing to Apachii's mod, which meant if you didn't have her mod installed, the texture wouldn't show.
_______________________________
[Update to 1.4]
All wigs are now available in white, and also fixed an issue causing two of the Iron helm wigs for females to be invisible.
_______________________________
[Update to 1.3]
Six styles for stand-alone wigs have been added (see third screenshot above). To update, just overwrite all files.
_______________________________
[Update to 1.2]
Wigs to fit the Iron helm have been added, named "Iron Helm Wig (Color)".
_______________________________
[Update to 1.1]
Support for male characters added (I thought the mesh would need editing but it doesn't appear to, so it was an easy fix). If you're updating from 1.0, just overwrite the .esp file.
Permissions
I received permission from apachii and Hein84 to release modified versions of their resources. If you'd like to release a revised version of this mod, get permission from them for their meshes/retextures. You don't need permission from me, I only ask that you don't upload it anywhere but here on the Nexus.
Credits
~Bethesda, big fan since Daggerfall <3
~apachii for the excellent ApachiiSkyHair mod
~Hein84 for the excellent Retextures
~Those who have commented with feedback and ideas, especially Mookeylama!
Thanks!
~CaBaL120 for the excellent aMidianBorn Nordic Carved retextures seen in my screenshots
~Nexus and its community :)
_________________________________________________________________________________
Modder's Guide
Here's a tutorial of the steps I used to make these. This doesn't include edits to the meshes I made to the helm wigs so they'd fit without clipping. Please leave a comment if you have any questions.
PART 1 - NIFSKOPE
Nifskope is open-source 3rd party software written to edit .nif files, the file-format Bethesda uses for 3D models in their recent games. If you don't have it yet, download the latest version here: http://niftools.sourceforge.net/wiki/NifSkope
Hairstyles will commonly come in two mesh files - the original and a "hairline" copy. For example, "hair20.nif" and a corresponding "hairline20.nif". In this first step, we're going to paste these two meshes together to resolve transparency issues. Open both .nifs and in the hairline mesh, right-click on the "NiTriShape" node, then under "Block", copy the branch (or just highlight and ctrl-C).
Alt-tab to the original mesh and paste the branch into the root "NiNode".
You're done with the hairline mesh so you can close it. Your original hair mesh should now look like this. I've expanded the "NiTriShape" nodes of both branches so you can see the "BSLightingShaderProperty" nodes for each. To change hair-color, you can edit the hair tint line found in the block details below, and/or create edited textures (see the next step). Note that you can open the color-wheel or click the actual hex color-code to enter the three 3-digit color values manually (useful if you want the exact same color every time).
Now I've expanded the "BSLighingShaderProperty" node to reveal the "BSShaderTextureSet" node. Notice the paths to the textures in the block details window below. If you want to customize the textures, you'll need to change these paths to your new textures (double-click the path to edit).
Remember that we're working with two "NiTriShapes" of the same style (the original and the one we pasted in from the hairline mesh), so any changes you make need to be applied to both.
Highlight the "BSDismemberSkinInstance" node. Expand the "Partitions" line in the block details and you'll see the "Body Part" line. This determines which slot is used, and must match what's used in the ArmorAddon in the CK or your item will be invisible when worn. For the stand-alone wigs, I use the default slot for hair (seen in the screenshot, SBP_131_HAIR, which is just called 31 in the CK), which will replace the character's hair when worn. So if you're making a normal wig like those, no changes should be needed here. For the helm wigs, I used slot 60 since the character's hair (slot 31) is hidden while wearing a helm. Note that slot 60 is a miscellaneous slot, so it might be used by other items added by other mods, meaning you could only wear one at a time unless you manually change to a different slot.
A number of additional changes can be made to the mesh here in Nifskope, but for now this is all you'll need to add a basic wig. "Save as" a new filename, and preferably save it in a new directory under your name in ...datameshes, or throw it in my Dupre232 mesh directory if you like.
PART 2 - CK
Start a new mod or just work with mine, "Nordic Carved Wigs.esp". Go to the "Armor" category and right-click --> duplicate something simple like a vanilla circlet, or if you're editing my mod, duplicate one of my wigs. Double-click this duplicate to edit and change the ID to anything as long as there's no spaces (I usually start the ID with "01" so it shows up at the top of every list). Change the name field below to be what you want the wig called in-game. Below, I make the value 1, the weight 0.01, and make sure armor is 0. For now, click OK and a warning will pop up asking if you want to make a new form. Click no, it'll ask if you're sure, click yes. Open it back up again and make sure "Default Race" appears in the drop-down menu at the top, then highlight / un-highlight slots until only 31 and 41 are selected (or whichever slot you used in your mesh).
If you're working with my mod, you'll notice my wigs use a keyword called "Dupre232Wig". This links to their enchantment info so that only the waterbreathing enchantment is possible. I also removed the "ClothingCirclet" and "JewelryExpensive" keywords. These changes are all optional.
Double-click the ArmorAddon listed in the box near the bottom (in the above screenshot, it's Circlet02AA). Enter a new ID (I usually go with the same ID as the item itself, with "AA" added to the end). Click OK and you'll get the same warning, but this time click Yes to create a new AA form. Back in the Armor window, the original AA will still be there. Right-click and delete it, then right-click again to add the new AA you just created. Now open this AA and highlight / unhighlight to get the same slots you used, making sure "Default Race" is selected above.
On the left side of this ArmorAddon window, you'll see a section for male and female data. Under whichever gender your wig is intended for (or both), click "Select" next to "Biped Model", then in the window that pops up, click "Edit" and browse to your wig's mesh.
To make it craftable, go to the "Constructable Object" section and create a recipe, or duplicate a simple one like the silver necklace. Enter a unique ID for the recipe, select your wig in the "Created Object" field, choose your workbench and any ingredients (I deleted all ingredients).